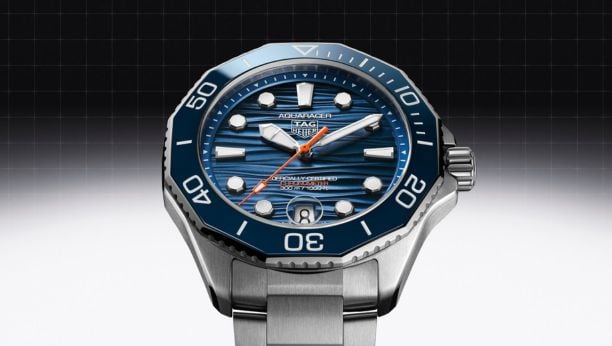
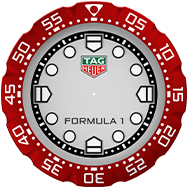
Sign in to TAG Heuer Golf app > Prepare your golf outing > Start a round > Play golf with your TAG Heuer Connected > Check your stats and history > Set up your Golf preferences
Enhance your golf experience with TAG Heuer Golf on your watch.
Already on the course? This tutorial will help you to find your way on the hole maps, read onboard data such as hole information, measure your shots and save scores.
Everything you need to know about automatic first shot detection is gathered in the last section.

STEP 1
Open TAG Heuer Golf
Press the top pusher to open the Sports menu on your watch, then press ‘Golf’ to open TAG Heuer Golf.

STEP 2
Start your round
Tap ‘Start a round’ to select a course, choose your tee box and scoring system, and adjust your handicap.
Launching and adding players to a game is detailed in the tutorial 'Start a round'.

STEP 3
View the first hole
On the course maps, the hole number is shown at the top of the screen, to the right of the flagstick icon.
By default, display is centered on the green, which you can recognize by its light green color. Map display mode can be configured in your Golf Settings (see ‘Set up your Golf preferences’ step 6).
The small red dot you can see on the green is your target. If it appears grey, wait a few seconds for your GPS to find your location.
Your course turns black when the watch goes into sleep mode.

STEP 4
View your distance to the green
Your distance to the green is shown at the top left of your screen. It is based on GPS data from your watch. As you walk towards the green, you will see the distance update.

STEP 5
Display hole details
Touch the distance to green to view hole information.
In this section is the hole number, the current time, and the ideal number of strokes to put the ball in the cup.
The first number at the top right is the distance to the back of the green from your position, the middle number is the distance to the center of the green, and the last number indicates the distance to the front of the green. The pin position is not shown since it is changed regularly on the course.
Swipe right to return to the hole map.

STEP 6
Choose your club
Below the distance to the green you can find your club recommendation.
This suggestion takes into account the distance you are from the green; when you move around, you can see the club change.
If you don't see a club name after the clubhead icon, wait a few moments for the GPS connection to be restored.
If there is no icon, you can turn recommendations back on in your Golf Settings. To do this, swipe up on your watch, touch ‘Settings’ and activate the 'Club Recommendation' switch. Swipe right to get back to the map.
Club recommendation can also be enabled on your phone (see ‘Set up your Golf preferences’ step 11).

STEP 7
Find your position
To find your location and view the entire hole, rotate the crown up to the bottom of the map.
Your position is symbolized by a blue dot. If it appears grey, wait a short time for your watch to retrieve your GPS signal.
Each gray circle around your position represents a distance of ten yards/meters.
The small light green rectangles located close to each other are teeing grounds.

STEP 8
About stroke measurement
Recording a stroke is like measuring the distance your golf ball has traveled.
To do this, your TAG Heuer Connected records the GPS coordinates of the point where you hit your ball, and those of the point where it landed. Only the starting and ending locations matter, so you can stop along the way or search for your ball without worrying about how far you go.
To record your first stroke automatically while playing, see steps 17 through 22 before reading on.

STEP 9
Record your shot
After you hit the ball, press the top pusher to start the recording. A red circle on the screen tells you it is in progress.
The number in the red zone corresponds to the distance you walk. It will increase as you move away from your starting ground.
You can now walk to the ball.

STEP 10
Save the club used
To finish recording your shot, press the upper pusher again and turn the crown to select the club you just used. Press the top button to validate your choice. Your shot is now counted and appears on the left, above the mention 'Score'; you are ready to hit your ball again.
The recording process is the same for all approach shots.

STEP 11
Record your putts
Once on the green, the distances are too short to be measured using your watch GPS, therefore only the number of putts will be recorded.
To save a putt, press the bottom button. The number of putts is written on the right in small, above the mention 'Score'.

STEP 12
Save player scores
To save players' scores and edit your own, press 'Score'.
Swipe vertically in the red and green columns to enter the scores, then swipe left to move on to the next player's score.
Press ‘OK’ and walk to the next hole.

STEP 13
Change hole
In your Golf Settings, you can choose between two modes to switch to the next hole, either by moving or automatically (see 'Set up your Golf preferences' in step 2).
To change hole manually, swipe right to view previous holes and left to see next ones. When the screensaver activates, you automatically return to the current hole.

STEP 14
Follow your performance
During a game, it is easy to get an overview of your progress on the course and your performance by looking at the colored arcs around the edge of your screen.
Each segment represents a hole, and if you own a TAG Heuer Golf Edition watch, you will have noticed that the corresponding hole number figures just opposite on the bezel.
The white color denotes the hole you are on, and the shaded holes are the ones you haven't played yet.
The other colors represent the holes played and indicate your score compared to the PAR. They are classified according to the rainbow scheme, from triple bogey (red) to eagle (dark blue).
White – Current hole
Shaded/Grey – Hole to play
Red – Triple Bogey
Orange – Double Bogey
Yellow – Bogey
Green – PAR
Light blue – Birdie
Dark Blue – Eagle

STEP 15
End round
At the end of your round, swipe up from the bottom of your screen to open the menu, then swipe down and select 'End round'.
Your game is now saved and viewable in TAG Heuer Golf on your phone.
Note that games must be stopped this way, otherwise recording will continue in background and consume your watch battery.

STEP 16
View your rounds and stats
You can open TAG Heuer Golf to read your round recap, view your stats, visualize your strokes and share your scores.
DISCOVER TAG HEUER GOLF ON MY PHONE
STEP 17
Drive shot detection – Activate Drive Tracking
So that you don't forget to record your first stroke, your TAG Heuer Connected watch is now able to automatically detect the first shot hit on each hole on your course.
To enable this feature, swipe up to open your Golf menu and touch ‘Settings’. Scroll down to 'Drive Tracking' and toggle the switch on: your swing will now be recognized automatically (this feature may consume more battery).

STEP 18
Drive shot detection – Hit you first shot
When using Drive Tracking, simply hit your ball to start recording the shot.
Your watch automatically recognizes your swing gesture and a red circle appears on your screen to signify that it has been taken into account.

STEP 19
Drive shot detection – Walk to your ball
Get off the tee and walk towards your ball as you usually do; the distance in the red box will increase the further you get from the teeing area.
Distance measurement works the same as when the feature is not activated (it is described in step 8).

STEP 20
Drive shot detection – Hit your second shot
Hit your second shot to stop the recording: the position of your second swing helps determine where your ball landed and tags your first shot.
As a reminder, you can also manually stop the recording by pushing the top button.
A confirmation message appears on your watch, giving you your stroke length. If the displayed club matches the one you used, simply press the top button to finish.

STEP 21
Drive shot detection – Select your club and validate
To change club, tap on its name and search for yours in the list. The selected club is shown in white. Push the upper button to confirm.

STEP 22
Drive shot detection – Record your other shots
From your second shot, recording continues the same as when Drive Tracking is disabled.
After hitting your second ball and validating the club used (steps 20 and 21), press the upper pusher to start measuring your second shot (see from step 9) and continue your round by following the guide until step 16.
Enjoy your golf session.